Rebeloperstore ist eine fertige Bilbliothek für In-App-Käufe. Hier eine Kurzanleitung als Ergänzung zu den umfassenden Videos von Rebeloperstore.com
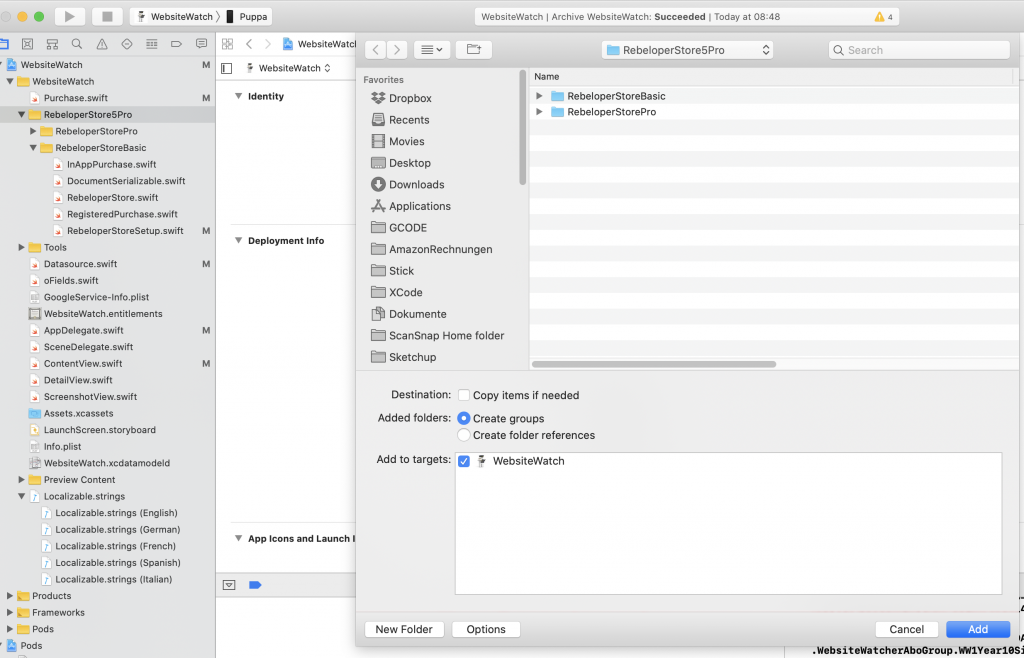
Den Ordner Rebeloperstore 5 dem Projekt hinzufügen.

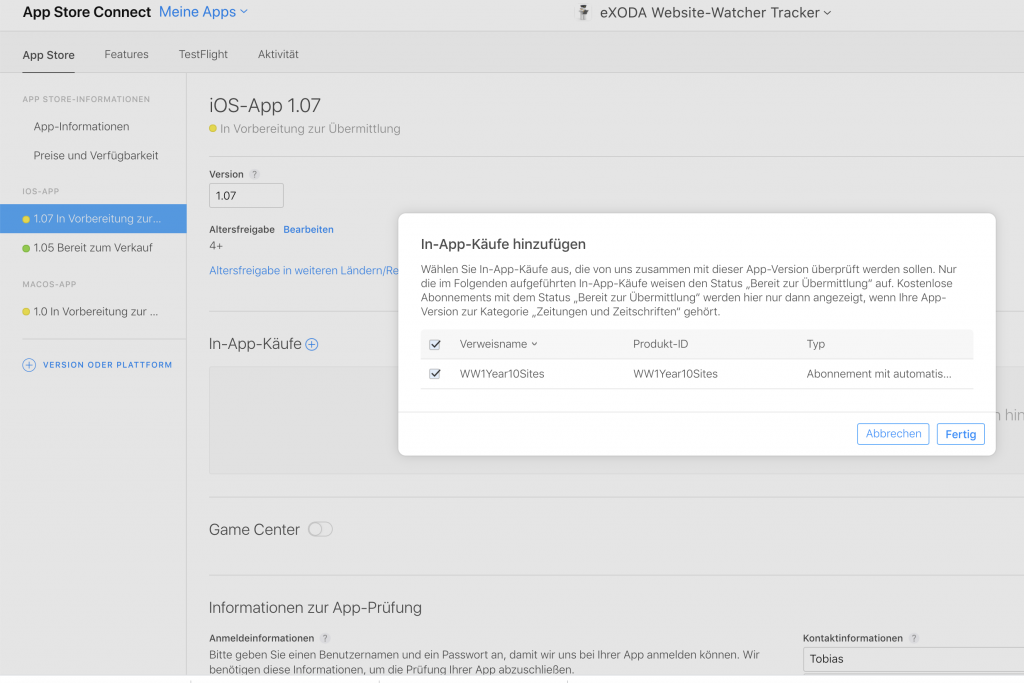
Im Bereich In-App-Käufer unter App-Store muss der Kauf der jeweiligen App zugeordnet werden.

In der AppDelegate.swift den Eintrag RebeloperStore.start() vornehmen
    func application(_ application: UIApplication, didFinishLaunchingWithOptions launchOptions: [UIApplication.LaunchOptionsKey: Any]?) -> Bool {
        // Override point for customization after application launch.
        RebeloperStore.start()
        return true
    }
Im File RebelopersotreSetup.swift die Anpassungen vornehmen.
Vor allem den App spezifischen Secret Key nicht vergessen.
//
//  RebeloperStoreSetup.swift
//  RebeloperStore5
//
//  Created by Alex Nagy on 31/07/2019.
//  Copyright © 2019 Alex Nagy. All rights reserved.
//
// THE SOFTWARE IS PROVIDED "AS IS", WITHOUT WARRANTY OF ANY KIND, EXPRESS OR
// IMPLIED, INCLUDING BUT NOT LIMITED TO THE WARRANTIES OF MERCHANTABILITY,
// FITNESS FOR A PARTICULAR PURPOSE AND NONINFRINGEMENT. IN NO EVENT SHALL THE
// AUTHORS OR COPYRIGHT HOLDERS BE LIABLE FOR ANY CLAIM, DAMAGES OR OTHER
// LIABILITY, WHETHER IN AN ACTION OF CONTRACT, TORT OR OTHERWISE, ARISING FROM,
// OUT OF OR IN CONNECTION WITH THE SOFTWARE OR THE USE OR OTHER DEALINGS IN
// THE SOFTWARE.

import Foundation

extension RebeloperStore {

    // -----------------------------------------------------------------------------
    // First save your in-app purchase ids in App Store Connect like:
    //
    // com.yourCompany.yourApp.sufix
    //
    // ex: com.Rebeloper.RebeloperStore5Example.nonConsumable
    //     ^- Bundle Identifier                 ^- sufix
    //
    // IMPORTANT: in the Rebeloper Store code the "com.yourCompany.yourApp" part
    // is fetched from your Info.plist file Bundle Identifier.
    // To create a "RegisteredPurchase" you have to add only the sufix.
    //
    // Notes:
    // 1. In RegisteredPurchase "consumable" and "non-consumable" in-app purchases
    // are added as ".regular"
    //
    // 2. Image urls are optional. They can be:
    //  a). none -> enter an emty String: ""
    //  b). in an asset catalog -> enter the name / path of the image
    //  c). a url -> enter the url of the image; has to be https!
    //
    // Now add your purchases below usig your in-app purchase sufixes.

    /*static let nonConsumable = RegisteredPurchase(imageUrl: "Icon-1024", sufix: "nonConsumable", purchaseType: .regular)
    static let consumable = RegisteredPurchase(imageUrl: "Icon-1024", sufix: "consumable", purchaseType: .regular)
    static let nonRenewing = RegisteredPurchase(imageUrl: "Icon-1024", sufix: "nonRenewing", purchaseType: .nonRenewing)
    static let autoRenewableWeekly = RegisteredPurchase(imageUrl: "Icon-1024", sufix: "autoRenewableWeekly", purchaseType: .autoRenewable)
    static let autoRenewableMonthly = RegisteredPurchase(imageUrl: "Icon-1024", sufix: "autoRenewableMonthly", purchaseType: .autoRenewable)*/
    static let WW1Year10Sites = RegisteredPurchase(imageUrl: "Icon-1024", sufix: "WW1Year10Sites", purchaseType: .autoRenewable)

    // -----------------------------------------------------------------------------
    // Create a list of your purchases if needed.
    // This can be useful if you're displaying them in a list.

    static var registeredPurchases: [RegisteredPurchase] = [
     /*   nonConsumable,
        consumable,
        nonRenewing,
        autoRenewableWeekly,
        autoRenewableMonthly,*/
        WW1Year10Sites

    ]

    // -----------------------------------------------------------------------------
    // If you're having auto-renewable in-app purchases
    // you must provide your app specific shared secret form App Store Connect.

    static let inAppPurchasesSharedSecret = "hier den Secret Key eintragen"

    // -----------------------------------------------------------------------------
    // When set to "true" you will find detailed logs in your console
    // when you're testing your in-app purchases.
    // Very usefull for debugging! Set it to "false" to turn it off.

    static let shouldLogRebeloperStore = true
}
Jeder In-App-Kauf muss angelegt werden. Der erste In-App-Kauf muss zur Prüfung übermittelt werden. Später können weitere ergänzt werden.
Wenn die In-App-Kauf den Status „Warten auf Prüfung“ erhält, dann gilt es halt abzuwarten. Die Prüfung des In-App-Kaufs geschieht unabhängig von der Prüfung der App. Mein Vorgehen ist das veröffentlichen der App ohne weitere In-App-Käufe. Danach definiere ich diese und warte die Prüfung ab. Dann werden die einzelnen in der RebelopestoreSetup eingetragen. Im Status Bereit zur Übermittlung sind die ProductIDs auch schon aus dem XCode Projekt abrufbar.
    static var registeredPurchases: [RegisteredPurchase] = [
        autoRenewableYearly,
        autoRenewSixmonth
    ]
Diese Methode Lädt die In App Purchases in eine eigene Liste, die wiederum mit dem List SwiftUI gelistet werden kann.
   func loadinapppurchases(){
        // MARK:- Populate with in-app purchases
        self.ListOfInAppPurchases.removeAll()

        RebeloperStore.inAppPurchases.observeNext { (inAppPurchases) in

            //            self.ListOfInAppPurchases.append(contentsOf: inAppPurchases)


        }
        .dispose(in: RebeloperStore.inAppPurchases.bag)

        var iIndex = -1
        for obj in RebeloperStore.registeredPurchases {
            RebeloperStore.getInfo(obj.sufix) { (product) in
                guard let product = product,
                    let _ = product.localizedPrice else { return }
                iIndex += 1
                let oInAppPurchase = InAppPurchase(id: product.productIdentifier, imageUrl: obj.imageUrl, registeredPurchase: RebeloperStore.registeredPurchases[iIndex] , title: product.localizedTitle, description: product.localizedDescription, price: product.localizedPrice!)
                self.ListOfInAppPurchases.append(oInAppPurchase)
            }

        }
    }
Über den Autor